Walkthrough: Integrate WealthOS 'Card' Payments in a tenant application ⚓︎
This walkthrough provides steps to integrate WealthOS card payments methodology to add money to an existing pot managed by the WealthOS backend.
Overview ⚓︎
This payment process consists of two main parts.
- Payment intent creation from WealthOS backend
- Payment GUI library integration with tenant front-end
Follow these steps to integrate WealthOS payment process with tenant backend and GUI. The walkthrough also covers how to set up payments using WealthOS tenant admin GUI in order to accept payments.
Setting up a payment method ⚓︎
This is the first thing you need to do when setting up payments in your WealthOS tenant system. WealthOS system supports several payment methods and you can set up each of them by providing necessary information using WealthOS tenant admin GUI.
For this walkthrough we are setting up Stripe as our payment method in the system.
Note: You need to have a Stripe account in order to follow these steps. If you do not have a stripe account, create one first.
-
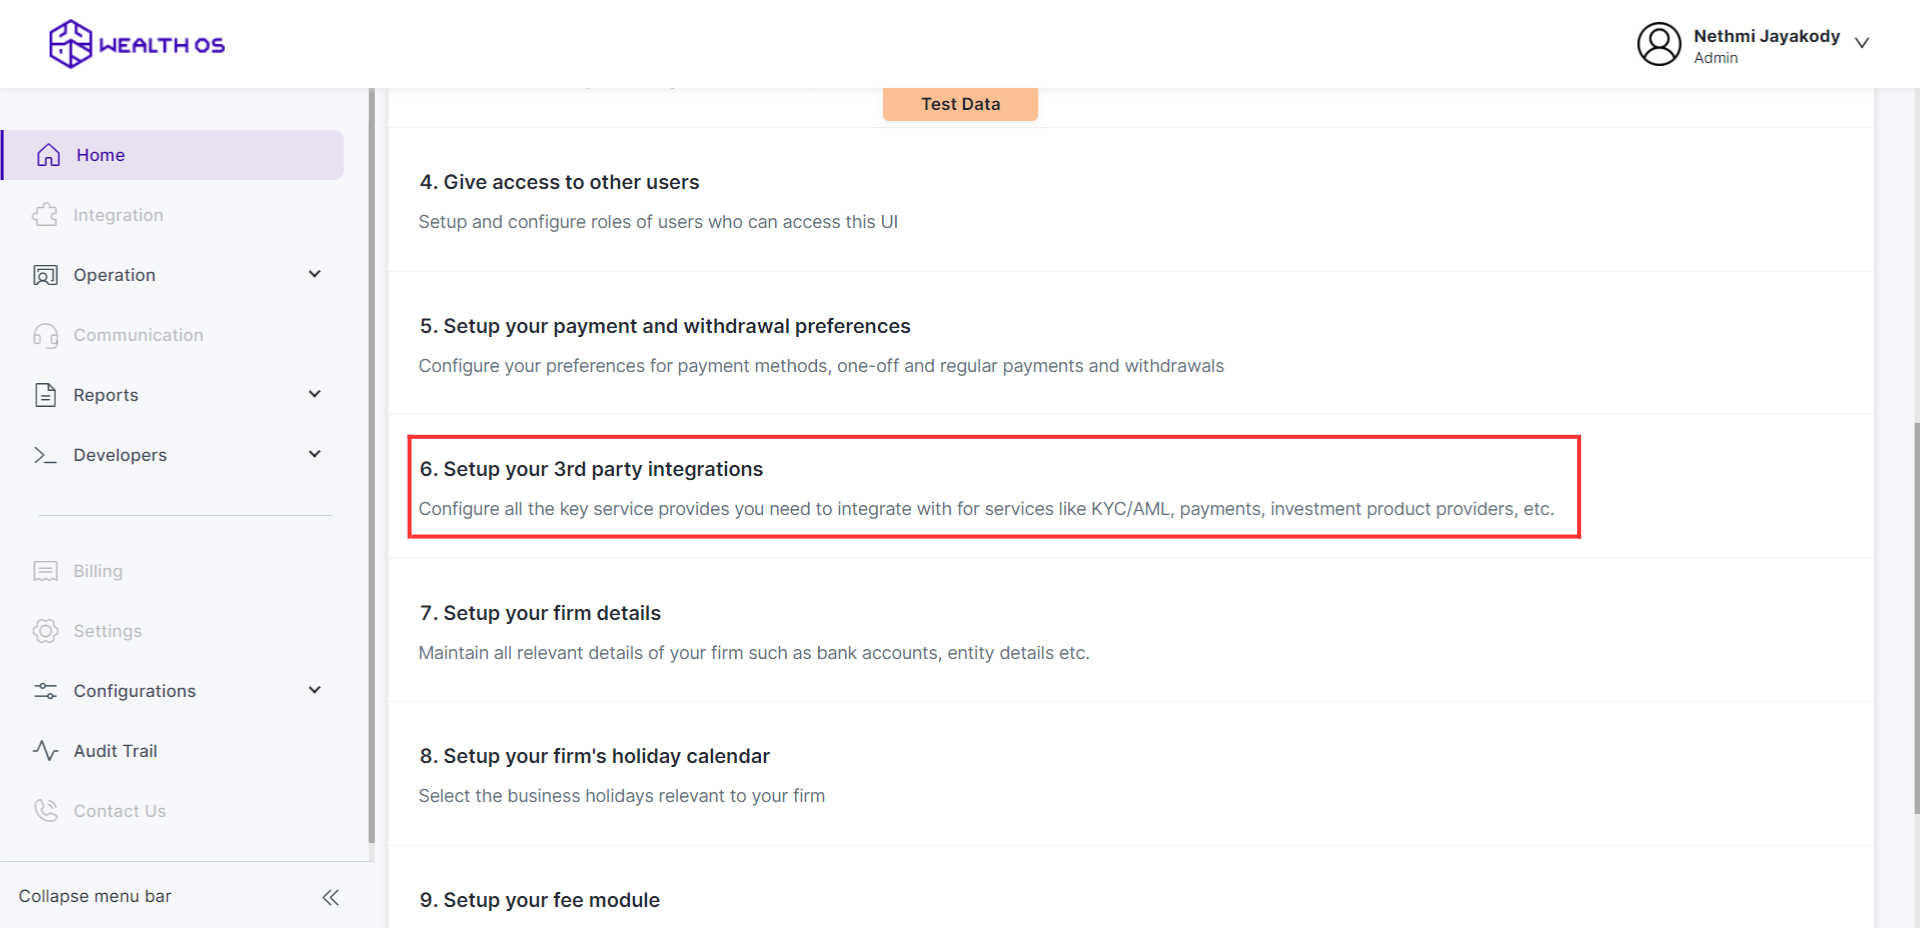
Log into the system with your credentials and select Set up your 3rd party intergrations option from Home page.
-
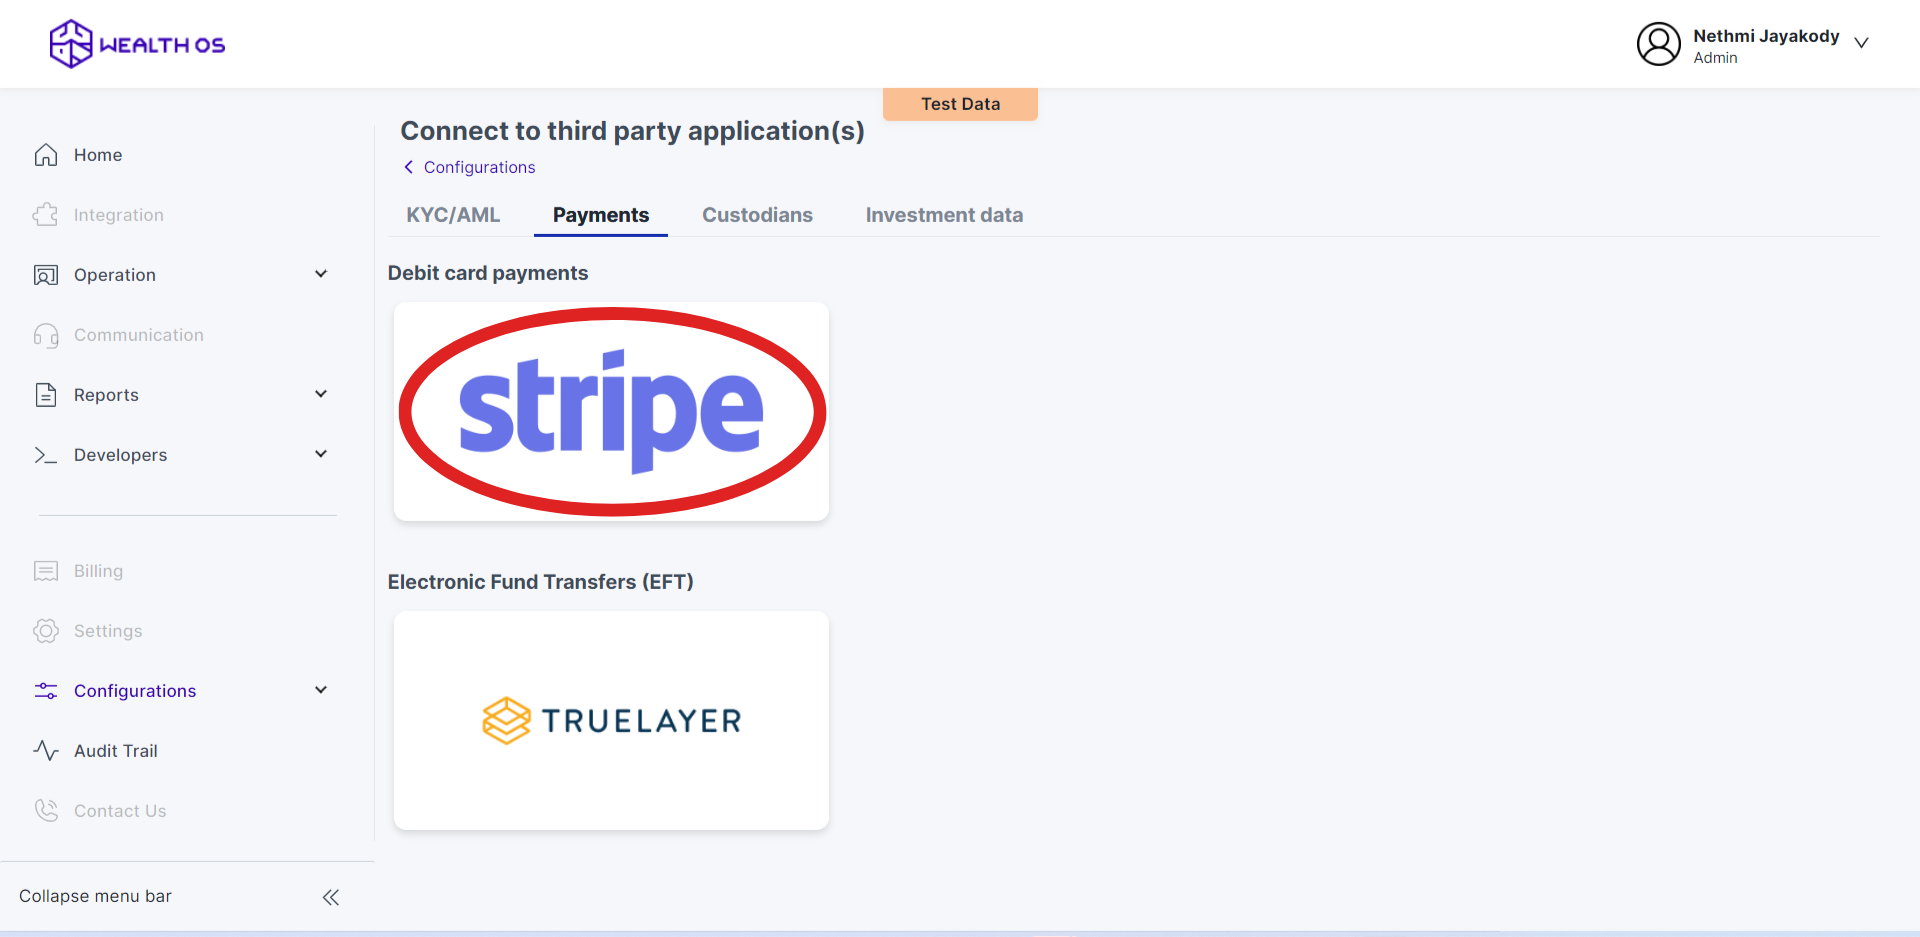
Select Payments tab and select Stripe. Then you will be shown a modal with Stripe configurations.
-
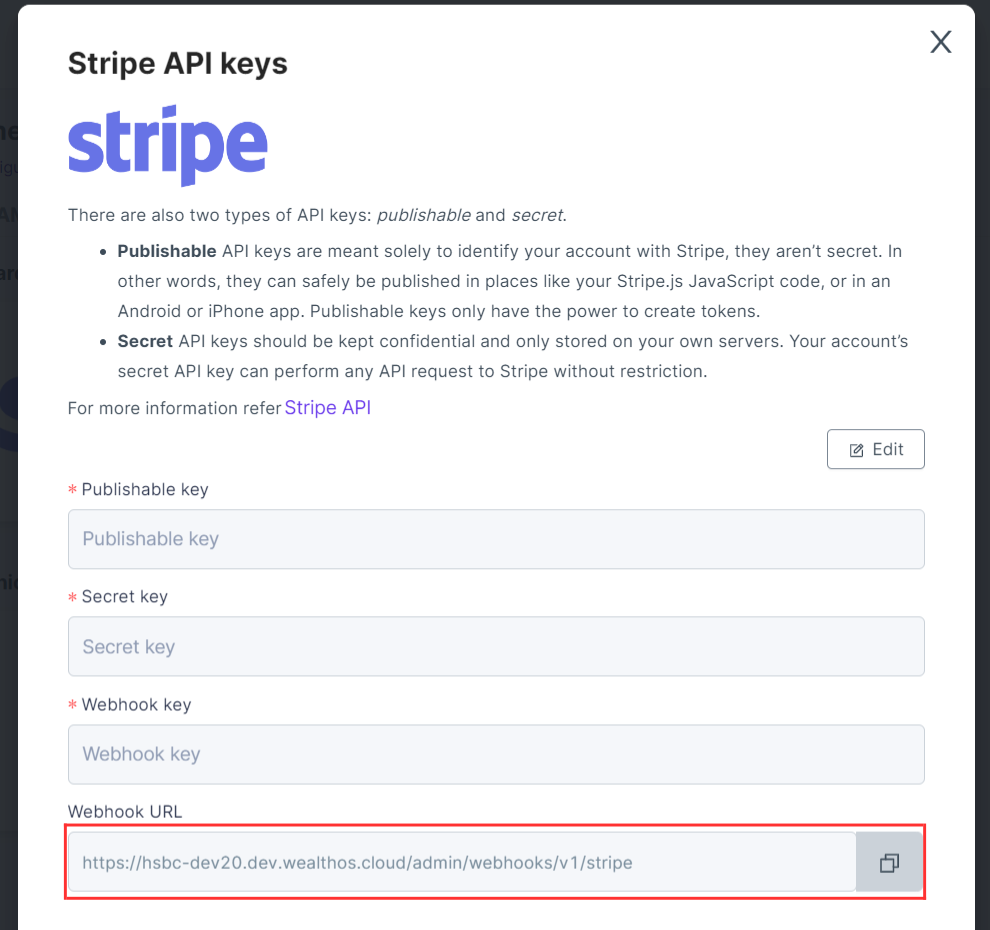
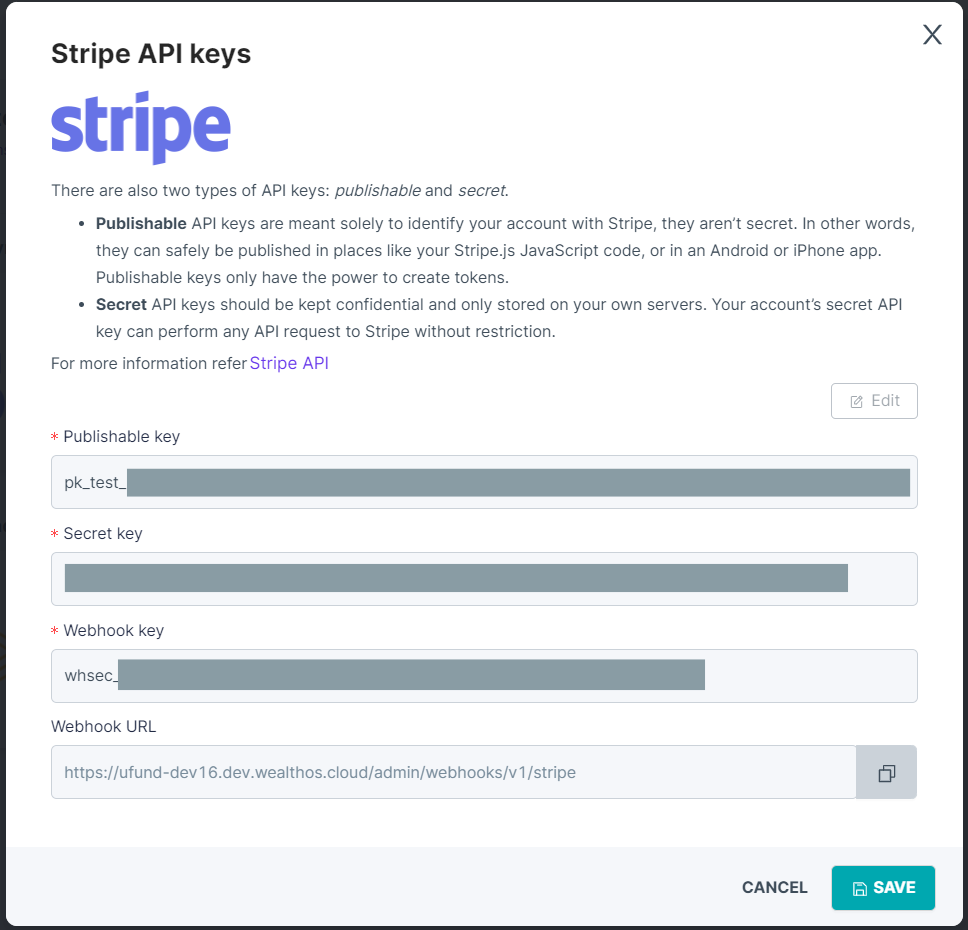
In order to configure Stripe, you need three keys from Stripe. Publishable key and secret key retrieval is simple but webhook key retrieval needs some work to do. As the first step we will register our webhook in Stripe to get the webhook key.
-
Copy Webhook url from the configuration modal by clicking on it.
-
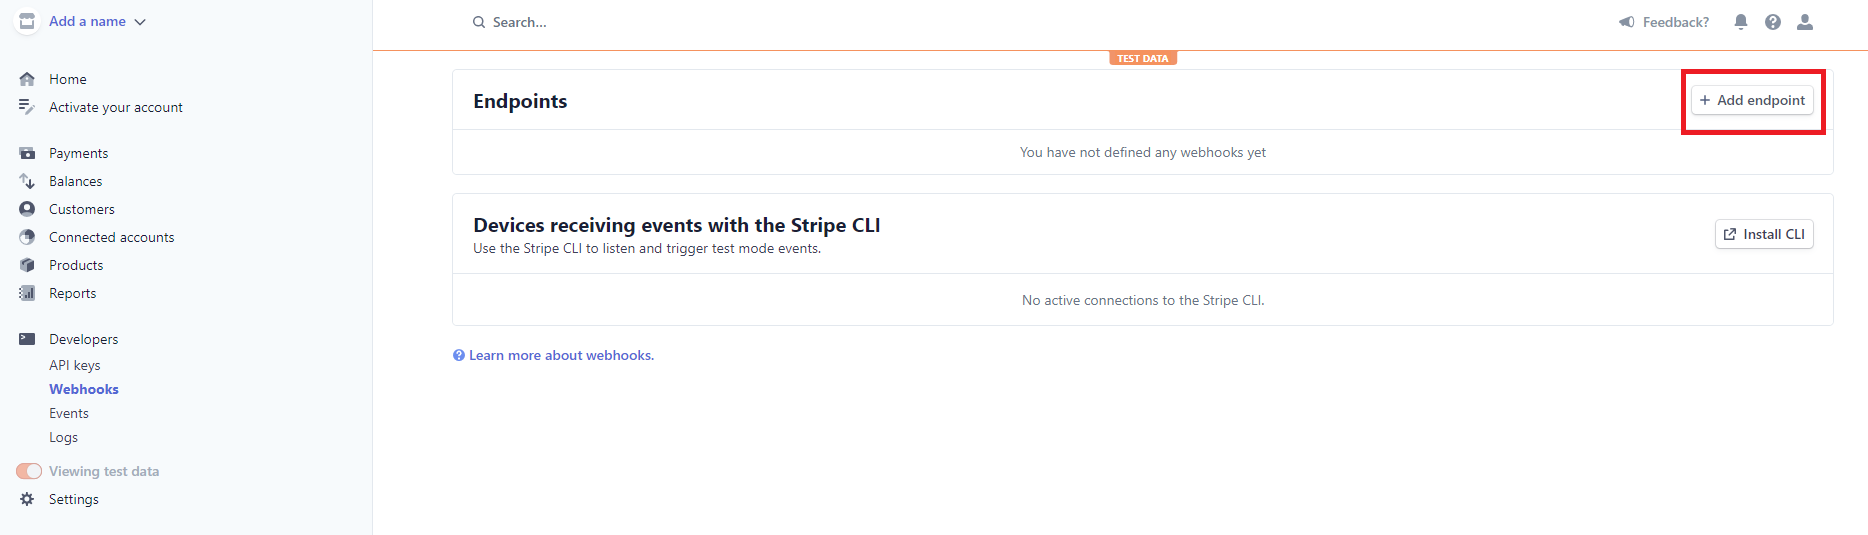
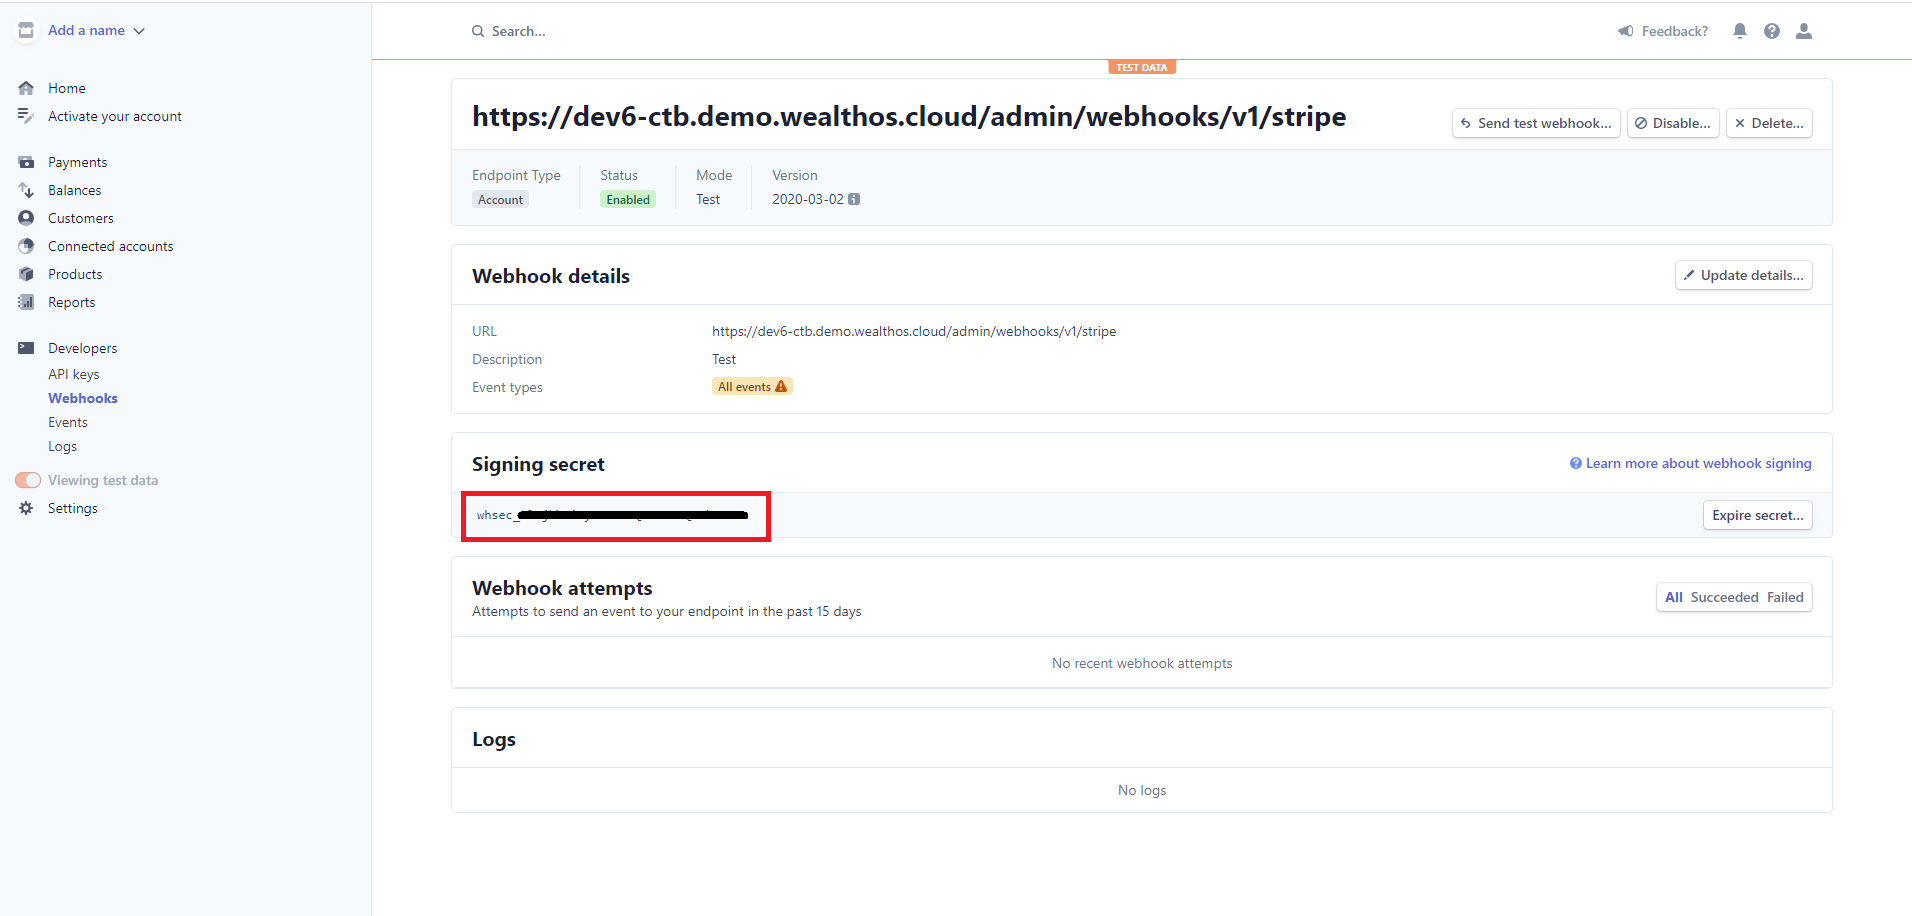
Log into Stripe with your credentials and goto Developers > Webhooks from the side menu. Then select Add endpoint to register our webhook in Stripe.
-
Paste the url we copied previously from our admin console to Endpoint URL and give a description. Then select receive all events option from Events to send section (highlighted below) and press add endpoint.

-
Adding the endpoint will produce a key in Stripe. You should use this key to configure the Webhook key in Stripe settings section of WealthOS admin UI.
-
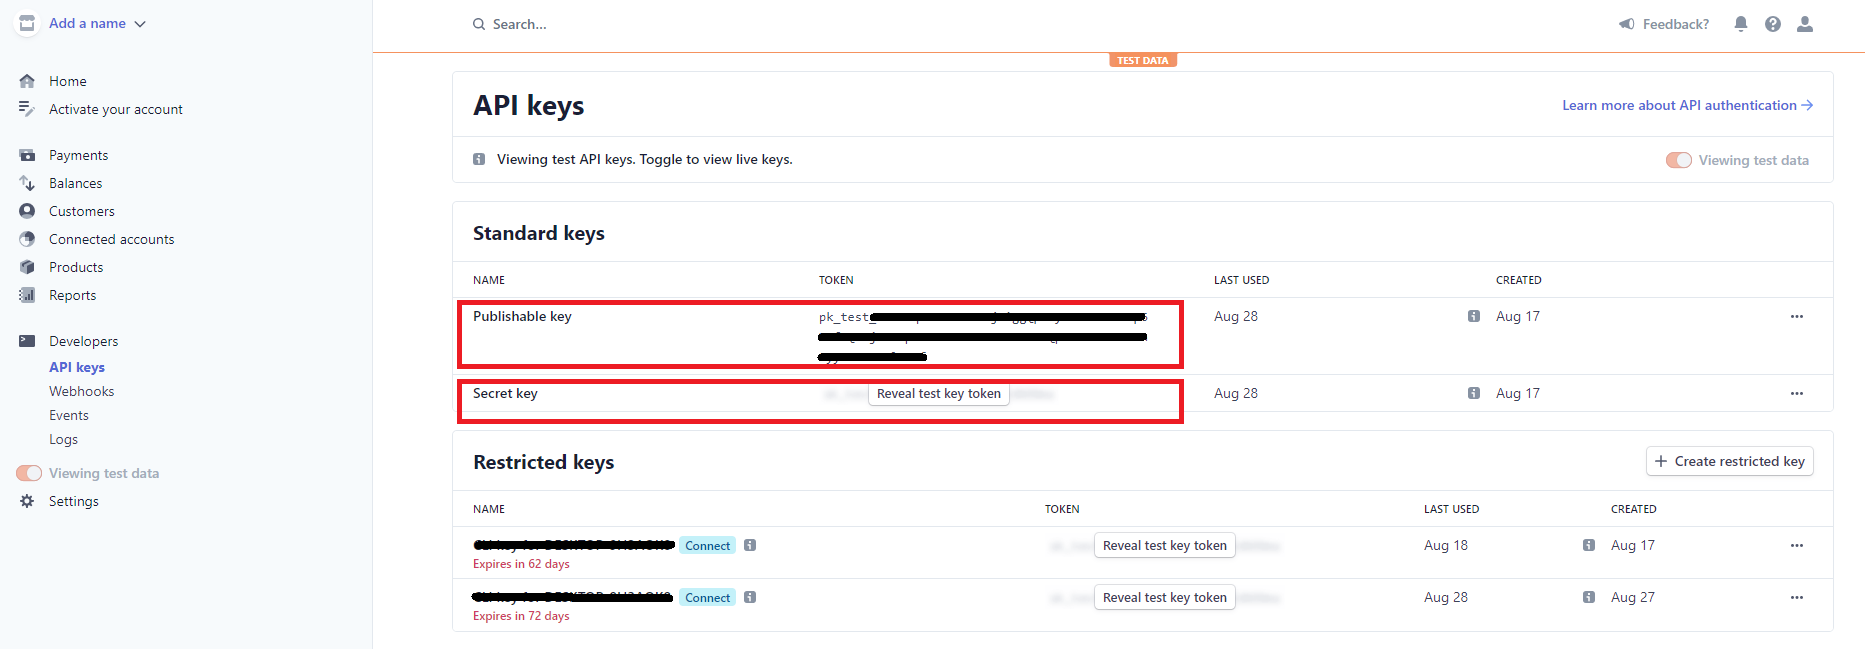
Go to Developers > API keys from the side menu to get the Publishable key and Secret key.
-
Let's add these keys in our Stripe configuration modal. First select Configure button in the modal to make the settings editable, and copy each key from Stripe dashboard to the text-boxes respectively. Then press save.
-
Now your WealthOS account has Stripe as a payment method.
Payment intent creation from backend ⚓︎
Now we have successfully configured a payment method, it' s time to integrate the WealthOS payment process to our backend and frontend.
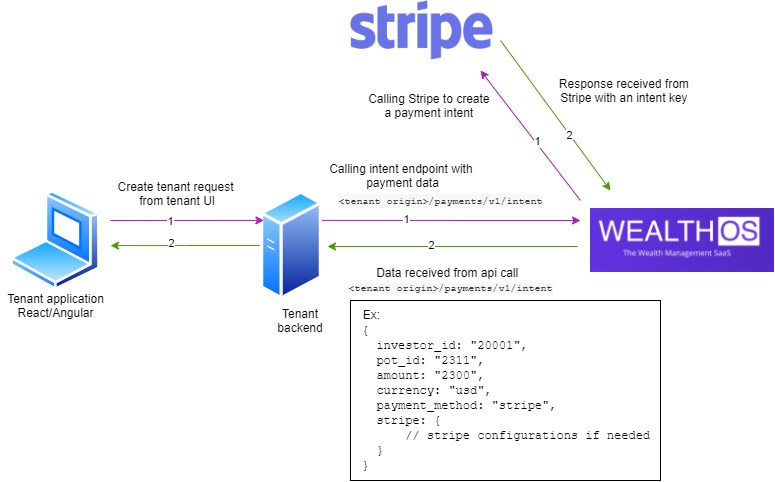
To do a payment, you need to have payment intent. This should be created by calling,
<WealthOS tenant origin>/payments/v1/ endpoint.
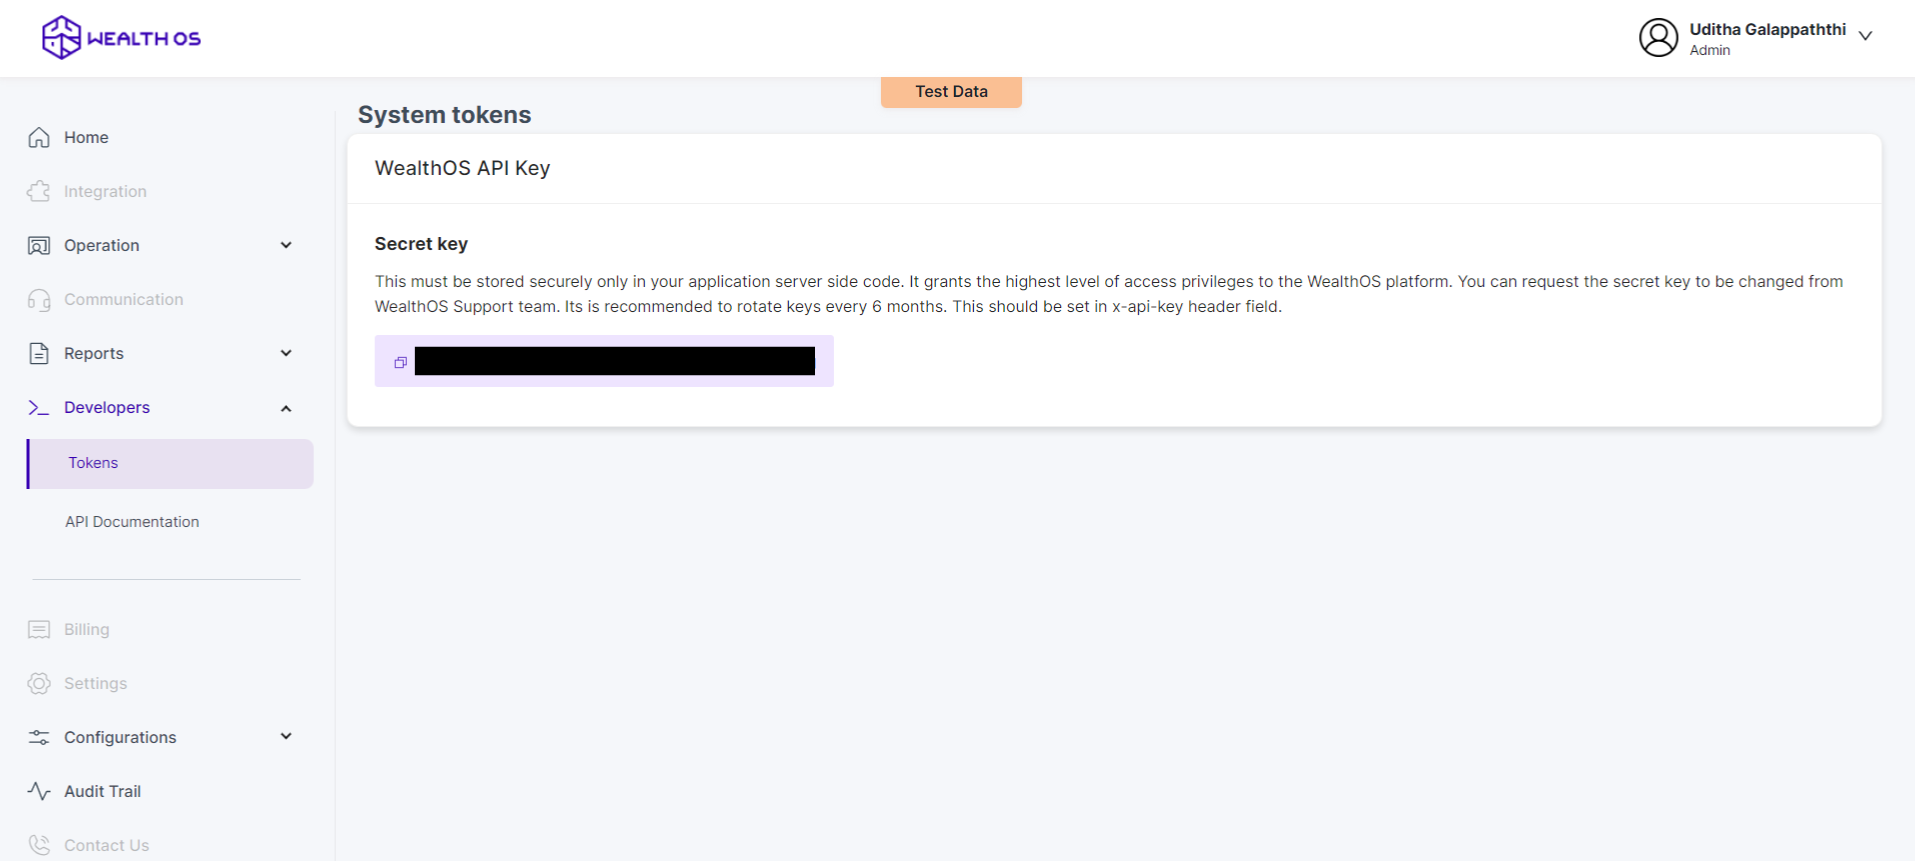
This endpoint should only be called from your backend and for this you need to have the secret key of your tenant. This key grants the highest level of access privileges to the WealthOS platform and should be set in the x-api-key header field.
To get your key, log into the WealthOS admin console and goto Developers > Tokens section on the side menu. You can get the secret key from here,
Following is a sample code written in NodeJS to create the payment intent,
const url = 'https://dev2-abc.demo.wealthos.cloud/tenant/payments/v1/';
const paymentData = {
  investor_id: "20201",
  pot_id: "3322",
  amount: "5800",
  payment_type: "card",
  service_provider: "stripe",
  purpose: "cash"
}

app.get('/create-intent', async (req, res) => {
const response = await fetch(url, {
  method: 'POST',
  mode: 'cors',
  cache: 'no-cache',
  credentials: 'same-origin',
  headers: {
    'Content-Type': 'application/json',
    'x-api-key': 'XXXXXXXX'
  },
  redirect: 'follow',
  referrerPolicy: 'no-referrer',
  body: JSON.stringify(paymentData)
});

const ret = await response.json();
res.json(ret);
});
To create a payment intent you need to send payment information. Payment data consists of following required fields,
- investor_id: Id of the investor you need to add the money.
- pot_id: Pot that the money should be associated with.
- amount: Amount that you need to add
- purpose: This should be one of cash or invest. Include cash for this.
- payment_type: This should be one of card or electronic_fund_transfer. In this case, it should be card.
- service_provider: This should be one of stripe, paypal or payoneer. Because we configured stripe before, we will add stripe as the value.
Data received from the call is important for our next step.
Integrating WealthOS payment components with front-end ⚓︎
WealthOS provides two libraries that are written in React and Angular to add payment capabilities to your frontend.
Configuring Angular library ⚓︎
-
Go to your angular project and run,
npm install --save @wealthOS/payments-ngx -
Import WOSPaymentsModule from @wealthOS/payments-ngx library to your app module.
import { BrowserModule } from '@angular/platform-browser'; import { NgModule } from '@angular/core'; import { WOSPaymentsModule } from '@wealthos/payments-ngx'; import { AppComponent } from './app.component'; @NgModule({ declarations: [ AppComponent ], imports: [ BrowserModule, WOSPaymentsModule ], providers: [], bootstrap: [AppComponent] }) export class AppModule { } -
Call your backend and get the payment intent object.
import { Component, OnInit } from'@angular/core'; import { HttpClient } from'@angular/common/http'; @Component({ selector: 'app-root', templateUrl: './app.component.html', styleUrls: ['./app.component.css'] }) export class AppComponent implements OnInit { title = 'wos-payments-ngx'; config?: any; lang = 'en'; constructor(private http: HttpClient) { } ngOnInit() { this.http.get('http://localhost:4000/create-intent') .subscribe((data) => { this.config = data; }); } onPaymentStatus(event: any) { } changeLanguage() { if (this.lang === 'en') { this.lang = 'sl'; } else { this.lang = 'en'; } } } -
Give the configuration object to the WOS payment component as an input,
<button (click)="changeLanguage()">Change Language</button> <lib-wos-payments *ngIf="config" [config]="config" paymentWidgetClassName="custom" [lang]="lang" (paymentStatus)="onPaymentStatus($event)"> </lib-wos-payments> -
Optionally you can also change the widget style by providing a class name for paymentWidgetClassName input and you can also change the language using lang input. (Note that there are only english and sinhala support at the moment).
}

::ng-deep .custom.wos-form-footer > .wos-pay-btn {
  background: red!important;
}

::ng-deep .custom.wos-form-footer > .wos-pay-btn:hover {
  background: white!important;
}
For more information: https://www.npmjs.com/package/@wealthos/payments-ngx
Configuring React library ⚓︎
-
Go to your react project and run,
npm install --save @wealthOS/payments-react -
Import the WOSPayments component from the library and add it to your project.
import React from 'react'
import { WOSPayments } from '@wealthos/payments-react';

import '@wealthos/payments-react/dist/index.css';

const cb = (state: boolean) => {

}

const App = () => {
  const config = {
    investor_id: "20201",
    pot_id: "3322",
    amount: "5800",
    payment_type: "card",
    service_provider: "stripe",
    purpose: "cash",
    stripe: {
      publishable_key: "xxxx",
      client_secret: "yyyy"
    }
  };
  return (<WOSPayments config={config} paymentCB={cb}> </WOSPayments>);
}

export default App
WOSPayments component is the main component exposed from the library. In order for this component to work, it should receive a config object.
This is the same object that was received from create intent call. Make sure you call <WealthOS tenant origin>/payments/v1/ rest endpoint from your backend and forward the data received directly to the component as the configuration.
For more information: https://www.npmjs.com/package/@wealthos/payments-react
Dataflow ⚓︎
Following diagrams depict the information flow of the system when with each action.
-
Data flow when creating a intent creation request
-
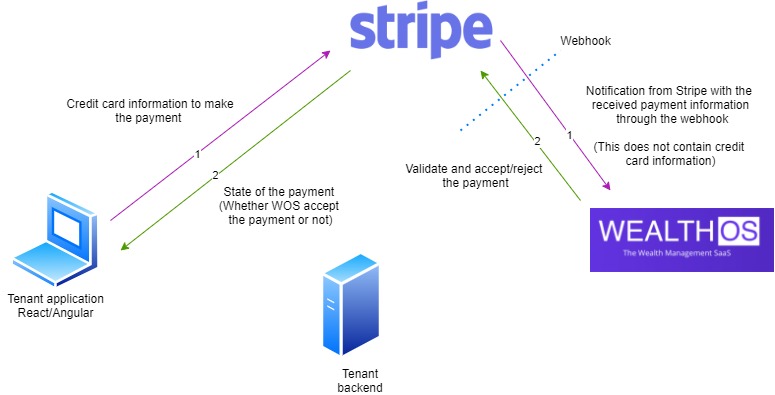
Data flow when adding a payment
Conclusion ⚓︎
Once everything is configured you can add payments from your system to WealthOS seamlessly.